Category Archives: CX500 Cafe Racer Build

CX-500 Cafe Racer – seat pan fabrication part II

Cafe racer build side view of Custom motorcycle seat pan

This post is the long overdue continuation of the motorcycle seat pan fabrication for my CX500 Cafe Racer Build Project.  Part I can be found here: Fabricating a custom motorcycle seat for the CX-500 Cafe Racer.  I’m a bit behind on this project, as I had hoped to have the bike done for May 1st.  I’m suspecting that I’ll be lucky if she’s done for May 15th or even May 30th.   Back on post topic,  I have finished the front mount on the seat, the overall pan shape and the fitment of the pan to the bike.

   underside of cafe racer seat pan

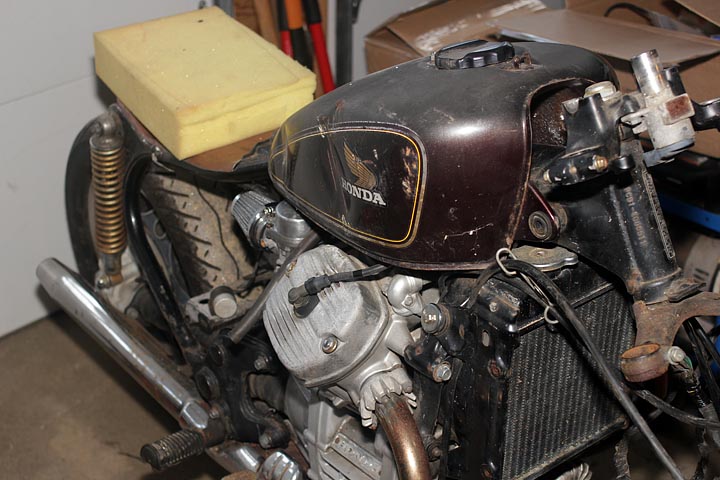
I decided to make the front of the seat match the contours of the tank, this is a bit away from the traditional flat seat look most Cafe Bikes have, but I think with the new sleeker tank from the CX500 Custom it looks better this way.  The front of the seat mounts by sliding under the rear fuel tank mounting point.  This took some careful fabrication and welding.  It can actually be screwed in by 2 M6x1.0 mm button head cap screws but it does not need the front screws as it is quite secure.

Honda CX500 Frame modifications for relocating electronics.

Above you can see the frame modifications,  I moved the rectifier up under the seat and put an additional cross brace to mount it in place.  I also plan to attach the wires to this cross piece to keep them from dropping down.  With the seat on the bike all of the electronics are nicely hidden away up underneath.  The solenoid and battery will be mounted into a belly box under the middle of the bike (post coming soon on that).

Top view of the seat pan on the bike.  I have not added rear mounting points yet. I’m debating how to do it still.  I will either weld on two nuts to the seat pan, or weld a bolt underneath the pan and make brackets on the frame to secure it to the bike.  You can also see the lines at the rear.  I am waiting until I finish the rear mini-fender before I make the final cuts to the back of the seat pan.  I want the mini fender to mount directly to the seat pan rather then the frame.  I was originally shooting for a metal rear fender but I suspect I will end up molding a fiberglass fender off the rear tire instead.

 seat pan with new custom fuel tank on Honda CX500 Cafe Racer       seat pan with new custom fuel tank on Honda CX500 Cafe Racer

I took the above pics with the tank loosely resting in place so you can see the seat mounted up to the tank and how it matches the contour of the tank.  I’m still doing paint prep on the tank so it is not firmly mounted for these pics and a bit tilted but you get the idea.

Stay tuned for Part III of the Custom Seat Fabrication for my Cafe Racer Honda CX500 build.


CX500C fuel tank swap on the Cafe Racer

Early on in the process, I decided that the large square ugly gas tank would be swapped off with a custom tank on the Honda CX500 Cafe Racer build.  The photo above shows the original tank on the right, and the modified  later model CX500C tank on the left.   I cut out the recessed fuel cap, and installed a weld in fuel cap bung made by drag specialties that takes Harley Davidson 84-E96 vented right hand thread compatible fuel caps.  I wanted a nice clean looking tank and this seemed like the way to go.  The new tank is about half the volume, but I’m not concerned this is not going to be a touring motorcycle and 2.5 gallons of fuel is more then sufficient.

mounting CX500C tank on a Honda CX500   Custom CX500C tank mounting on CX500

Somewhat surprising but two significant modifications had to be made to the frame to make the Honda CX500C tank fit and mount up on my CX500 model bike.  I initially thought that it would be an easy bolt on swap when I picked up the smaller much more attractive looking CX500 custom fuel tank.   I first moved the rear mount such that the tank would fit over the stock mounting points used on the original tank. I bored out the metal washers so they would fit over the studs.  I used this method to locate the rear mount, which I cut off the frame and ended up moving about 2″ forward.  This put the tank in the right spot such that the indents for the coils on the underside of the tank were in the correct location.  I turned some custom threaded bosses on the lathe for new front mounts.  Then I cut off the original studs and tack welded the new threaded bosses onto the frame located centered over the original studs location.  When the frame is stripped for painting I’ll finish weld the mounting bosses in place.

Custom fuel tank build CX500 Cafe Racer   Custom fuel tank build CX500 Cafe Racer

After I moved the mounts and the tank was mounted to the frame it was time to do a little custom work on the top of the tank.  I wanted a cleaner look then the ugly stock flap over locking fuel cap.   First I cut out some sheet steel to fit the opening roughly. Then I used the planishing hammer to form the compound curves.  It is harder to make a compound curved piece of metal then most people think.   A lot of careful hammering, planishing, and bending got the fit just right so the curves matched up perfectly.

   CX500C fuel tank modifications for harley fuel caps

I left a bit of the recess lip on the inside of the tank.  This should provide additional strength to the top of the tank and help with any oil canning and distortion from welding.  This type of welding requires very large amounts of patience.  The goal is to keep the metal cool the entire time so you don’t get oil canning or warping of your metal due to excessive heat.  Lots of little spot welds with cooling time in between keeps things from getting too hot.

   Custom CX500 fuel tank modifications

The finished weld looks good.  Still needs some prep work prior to painting but nothing more then a skim coat of filler will be needed for a flawlessly perfect finish on the tank.

CX500 Cafe Racer fuel tank swap  Custom Cafe Racer gas tank install  Cafe Racer Modified rear CX500 frame

The tank is ready for final stripping, metal prep, priming and painting.  This is some of the last fabrication and customization of the original Honda CX500 frame.  Soon I’ll pull the motor and remaining parts to strip and paint the frame/rear swing arm and start the reassembly of the bike for spring riding.  I’ve been sandblasting restoring and painting the small parts all winter in preparation of the reassembly of the bike.

Rebuilding the Front Forks on the Honda CX500

Part of turning my Honda CX-500 into a cool Cafe Racer is restoration work.  The front forks did not leak even a bit, but I felt it was worth the time while I had the bike apart to clean and rebuild them.  Also disassemble and cleaning would allow me to clean sandblast and paint the lower fork bodies to go with the rest of the bikes new cafe racer look.   This starts with removing the front forks from the bike.  First remove everything from the front end (wheel, brakes, etc)  and supported the bike under the engine.   It’s important to loosen/break free the top bolt on the fork (labeled with the red A in the above picture) before loosening the upper and lower triple clamp bolts (labeled B above).  It can be quite hard, even impossible to do this later.  My bolts were not particularly tight nor stuck so I was in luck and they loosened easily.

After the fork is off the bike, and before you take the top bolt off completely clamp the lower body carefully in a vice.  There is a socket head cap screw on the bottom of the fork that you need to loosen with a 6mm allen wrench or equivalent tool.    Then while pressing down (use some rags and a leather glove)  you can unthread the top tube cap.  It is under quite a bit of pressure from the compressed springs so be careful not to let it fly off into never never land when you reach the last thread.

Clean all of the parts in clean ATF, solvent, or your favorite degreaser.  I took the lower tube and sandblasted and painted it with engine enamel in a semi gloss black.    Note the bottom of the larger coil spring is somewhat tapered on one end.  The tapered end goes against part A (above) which goes inside the fork tube B and then part C goes on the outside. I was a bit confused about this as some time had passed between disassembly and assembly.

Front fork Assembly order for CX500 Motorcycle

These are all of the parts shown (minus the fork seal as it is installed in part 8) in order of which they go.  I tried to lay it all out as in an exploded diagram but it was ridiculously long.  This should get you the right assembly order to put your front fork back together should you have forgotten how it goes.  Be sure to pour the new fork oil in before screwing the top cap back on but after tightening the lower socket head cap bolt part #9 above).  The Factory service spec calls for 135cc of fork fluid on a dry rebuild.  I wanted to stiffen up the fork a bit and added another 25cc on top of that. The extra fluid decreases the free volume of air in the fork and acts to increase the dampening rate.   Decreasing the free volume is a trick to stiffen up a front fork a bit.   It is challenging to get the top cap (part #1) on as you have to compress the springs while threading it onto the fork tube.  I managed solo but it took some gorilla like effort on my part. Enlisting the aid of a friend would make this step easier and I recommend it.

My shiny newly rebuilt front fork is ready to be put back on the CX500 Cafe Racer.  Spring is just around the corner and I aim to have the bike ready for April 1st.  I’m leaning towards using bellows type dust seals on the forks in place of the factory/stock dust seals.   Hope this article helped you if you are looking to rebuild your forks.  If you have any questions, leave a comment below and I’ll do my best to answer promptly.

CX 500 Cafe Racer progress report

CX500C tank fit on the CX500 Cafe Racer

Time for a progress report on the Cafe Racer build.   I rebuilt the carbs completely stripping them and put them back on the bike.  She ran well for about 15-20 minutes in the garage. I then took her out for 15 minutes of riding up and down the driveway.  It was fun to ride, even if it was a short trip.  Since she was warm I changed the oil and filter afterward.

Everything mechanical seems to work great.   The CX500C fuel tank came in and I’ve test fit her in place.  I think it looks awesome and I’m starting to see the total bike “vision” come together.  I’ve picked out my headlight, but have yet to find a tail light set up that makes me happy.  I am considering making my own using  Luxeon Superflux LEDs at this point as none of the tail lights out there really fit with what I want for this bike.

CX500C tank fit on the CX500 Cafe Racer  Honda CX500 Upper tri hole moount  Honda CX500 with front suspension removed

   Based on a couple friends suggestions, I plan to do a few how to posts in the near future.  I don’t think I want to turn projects by zac into a how to/tutorial site, but I understand people want more informative and less documentary type posts.   I’ll be starting with a post on how to change and clean out the front forks on the CX500.  I’ve pulled them off the bike along with the rest of the front end to start cleaning, refurbishing and painting the various parts.  I’m leaning towards clip on handlebars at this point.  That way I can machine smooth the upper triple clamp.  I really want to remove the key/ignition switch, but I’ve learned with my 67 Vespa VLB Sprint how critical it is to have a bike that has at least the appearance of being secure.