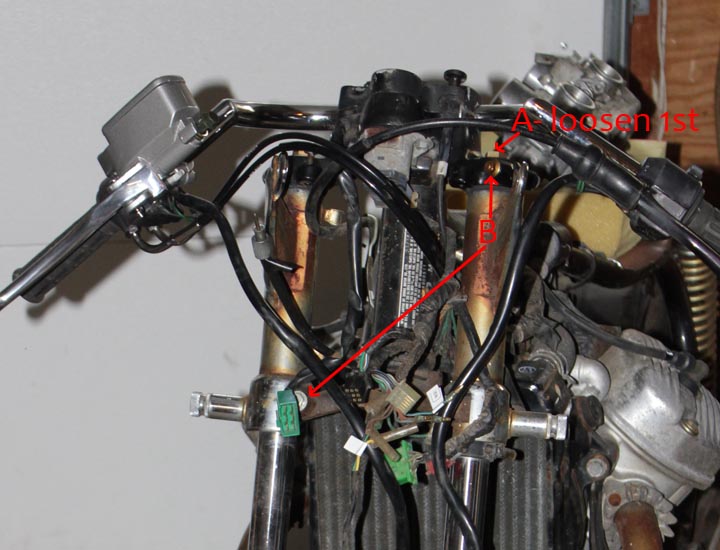
 Part of turning my Honda CX-500 into a cool Cafe Racer is restoration work. The front forks did not leak even a bit, but I felt it was worth the time while I had the bike apart to clean and rebuild them. Also disassemble and cleaning would allow me to clean sandblast and paint the lower fork bodies to go with the rest of the bikes new cafe racer look. This starts with removing the front forks from the bike. First remove everything from the front end (wheel, brakes, etc) and supported the bike under the engine. It’s important to loosen/break free the top bolt on the fork (labeled with the red A in the above picture) before loosening the upper and lower triple clamp bolts (labeled B above). It can be quite hard, even impossible to do this later. My bolts were not particularly tight nor stuck so I was in luck and they loosened easily.
After the fork is off the bike, and before you take the top bolt off completely clamp the lower body carefully in a vice. There is a socket head cap screw on the bottom of the fork that you need to loosen with a 6mm allen wrench or equivalent tool. Then while pressing down (use some rags and a leather glove) you can unthread the top tube cap. It is under quite a bit of pressure from the compressed springs so be careful not to let it fly off into never never land when you reach the last thread.
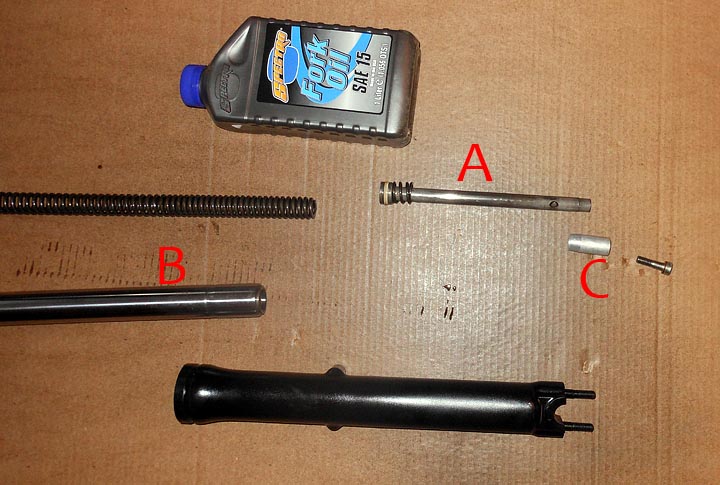
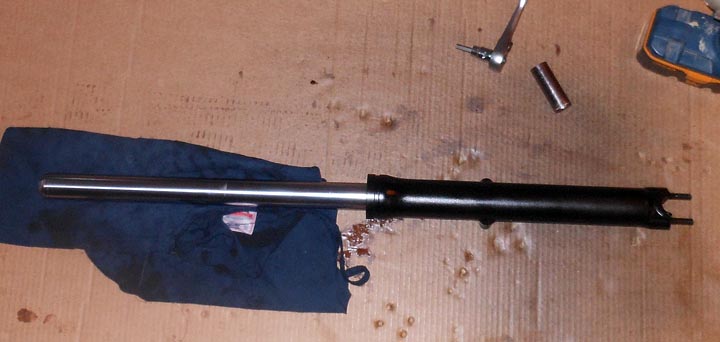
Clean all of the parts in clean ATF, solvent, or your favorite degreaser. I took the lower tube and sandblasted and painted it with engine enamel in a semi gloss black. Note the bottom of the larger coil spring is somewhat tapered on one end. The tapered end goes against part A (above) which goes inside the fork tube B and then part C goes on the outside. I was a bit confused about this as some time had passed between disassembly and assembly.
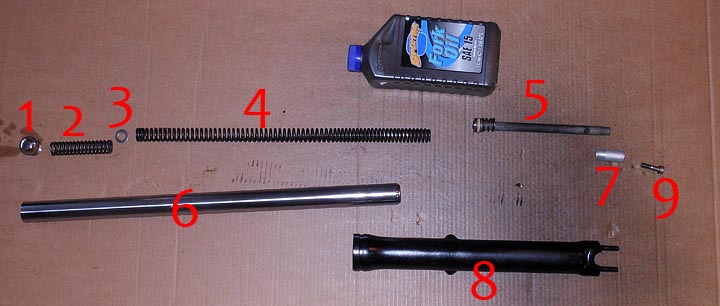
These are all of the parts shown (minus the fork seal as it is installed in part 8) in order of which they go. I tried to lay it all out as in an exploded diagram but it was ridiculously long. This should get you the right assembly order to put your front fork back together should you have forgotten how it goes. Be sure to pour the new fork oil in before screwing the top cap back on but after tightening the lower socket head cap bolt part #9 above). The Factory service spec calls for 135cc of fork fluid on a dry rebuild. I wanted to stiffen up the fork a bit and added another 25cc on top of that. The extra fluid decreases the free volume of air in the fork and acts to increase the dampening rate. Decreasing the free volume is a trick to stiffen up a front fork a bit. It is challenging to get the top cap (part #1) on as you have to compress the springs while threading it onto the fork tube. I managed solo but it took some gorilla like effort on my part. Enlisting the aid of a friend would make this step easier and I recommend it.
My shiny newly rebuilt front fork is ready to be put back on the CX500 Cafe Racer. Spring is just around the corner and I aim to have the bike ready for April 1st. I’m leaning towards using bellows type dust seals on the forks in place of the factory/stock dust seals. Hope this article helped you if you are looking to rebuild your forks. If you have any questions, leave a comment below and I’ll do my best to answer promptly.
Hi. I was thinking of doing a rebuild and lowering of my 78 cx500. Do you think i would put less oil in? I will be cutting the larger spring and adding an equal length spacer to keep the same spring compression.
Ramon, You do not want to put less oil in. The oil controls the dampening rate not the ride height. I also would not recommend cutting the springs down. People sometimes at a spacer to “stiffen” the spring rate a bit but I can’t recall anyone suggesting cutting the springs to lower the bike. Most of the bikes I’ve seen lowered simply clamp the upper tubes with a 0.5 to 1 inch sticking out above the upper triple clamp. That will get you lower without increasing the likely hood of bottoming out etc.
I realize this was from last year, but I have to say great write up! I used this yesterday to rebuild my front forks on my 79 cx500. I put maxima 15 weight oil in them, and now even though I can push down on the front end and almost bottom them out, the front end does not dive hardly at all when I grab the front brakes. My only issue is I can feel every little bump in the road. How do I fix this? Lighter weight oil?
Thanks.
Jim, I think perhaps the solution is to take a few cc’s of oil out of the fork. My understanding is if you over fill, front forks you end up without the necessary airspace needed for them to work properly in terms of cushioning and damping road noise. I’ve been told by a number of bike friends that the oil weight doesn’t affect things as much as everyone feels it does and that the volume of oil is the critical part. A few extra cc’s makes it stiffer.
i am in the same boat as ramon. I would like to lower bike but do not want to cut down the springs. I have already left 1″ out of the upper triple but still needs to come down farther for the look i want to be acheived. Any thoughts on swaping out forks from another bike that are not as tall. Open to all suggestions. Thanks for the time. 78 cx500.
I’m sure you could swap out the front forks. I’ve noticed a number of people have done so to various effect. If you want to go hog wild you could even get a front end off of a more modern bike with inverted forks and make new triple clamps to put them on. I think you would need to do a lot of homework and see which bikes have shorter stiffer front ends. Another option, is to push more out of the top triple, then use clip on bars on top of the triple to mask that you have 2″ sticking up. I think you’d want to stiffen the front spring for that, maybe by adding a spacer or a short stiff spring section. I have not yet set my front fork height but as I’m a big guy I plan to only drop it 3/4-1″.
Cbr forks generally bolt right on wit no modification just a little mix and match of parts and gsxr forks have a mit made by someone i just cant remember who lots of info for swaps for cx500 at the cx500 fourm
Oops just realized how old this is and also forgot to mention that the swap is not just the forks you need the whole front end ie. Tripples calapers wheel rotors and such
That’s interesting. If I ever get around to another one of these bikes I plan to do more a modern front fork upgrade like you suggest Mike.
A lot of modern bikes forks will bolt right to it with the top bearing exchanged, from what I’ve read on other forums. Even gsxr forks are near perfect match.
Great write-up thanks for sharing your experience.
In your first photo the tops of the inner fork tubes are showing quite a lot of rust. Can you tell us how you treated the rust.
My 1978 CX500 has some pitting in the same area and I ‘m wondering how to treat it.
Can the inner Tubes be re-chromed ?
The rust was all on a chrome sheet metal cover. I simply tossed this bit in the recycle bin as it was not part of my vision for the bike. I believe these rusty covers were also the way the oem headlight unit was mounted, but it was a long time ago so don’t hold me to that one. There are places you can send to have parts re-chromed, it can be pricey but it comes back looking like new.
Hello Zac I have 1981 Honda CX500 Custom I want to change my front forks because it a Air Pressure Forks and I don’t want to change it to modern front forks because I like to keep it old school and classy look cafe/brat look , is there away around to convert to hydraulic front forks ? or can I swap it with the earlier model like Honda cx500 from 1979 to 1980 will that works?
Hi Le, I’m not sure which parts interchange and which do not on these bikes. You can probably swap them from a similar model year bike, but you need to look at part interchange tables to see if they will fit easily.
Great write up! I’m going to tackle my fork rebuild this weekend.