Category Archives: Tool builds improvements and repairs

A quick easy way to make an XL series timing belt mount

XL timing belt mount

Timing belts are useful for all sorts of synchronous motion.  They can be used to connect a rotary encoder to a lathe spindle or to provide linear positioning on a 3D printer.  They have little stretch or flex and can accurately transmit rotational motion.   One of the challenges with using timing belts is mounting them in your projects.  This is especially true when you want to use timing belts to convert rotational motion of a computer controlled stepper motor into positionally accurate linear motion on a project like my 3D printer build.  Here’s a fast and easy way to make yourself a timing belt clamp and mount for your project.  The clamp shown in this post will function as the y axis mount on my DIY 3D printer (photo installed at the end).

how to make a timing belt clamp using hot glue-1645

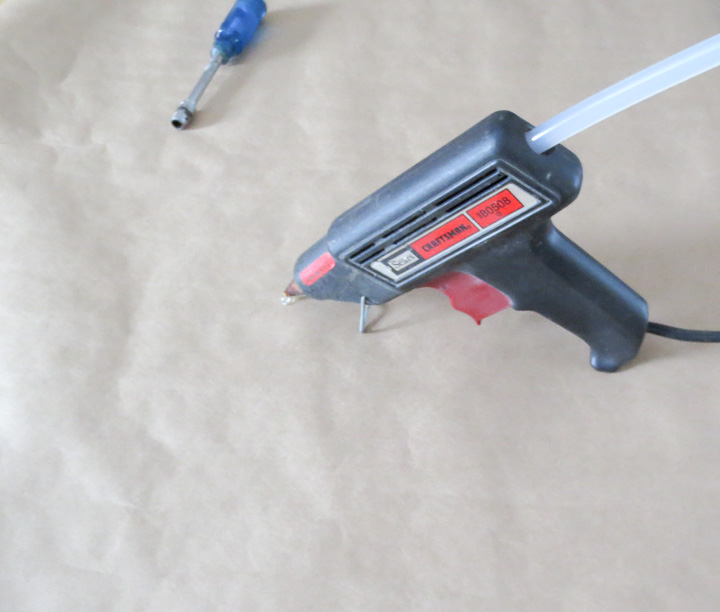
Any craftsman, maker, car guy, or project loving person knows about and owns a hot melt glue gun. They are good for many things,  in this project the hot melt gun is going to provide the plastic uses to pattern our timing belt interlock features on a substrate.

how to make a timing belt clamp using hot glue-1648    L series timing belt clamp

Wear gloves when playing with hot things!

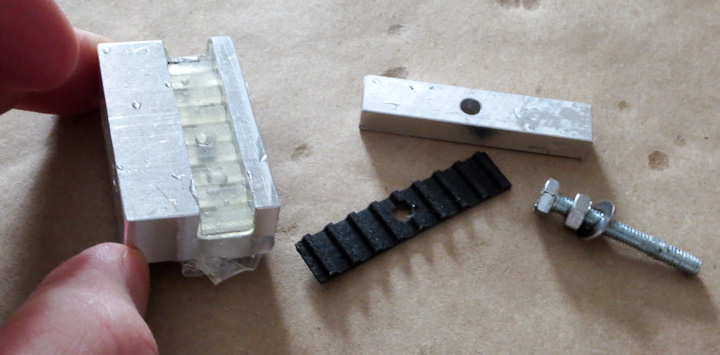
First you need to make a mounting block for use as a substrate from your material of choice.  Aluminum in this case.  I machined the part to fit onto my 3D printer’s y-axis structural cross member.  I cut a small scrap of XL series timing belt to fit the groove. This is why it is always good to hold onto things like a scrap bit of timing belt.  It may be hard to see in the picture above but I drilled a series of 6 shallow holes into the timing belt slot to allow the molten hot glue to seep in and form mechanical interlocks.  It’s best not to rely on the adhesive strength of the hot glue, mechanical interlocking features for the polymer to mold into provide good shear resistance.

Pre-heat the substrate.  You could use a project toaster oven,  heat gun, 500w lamp, etc.  I used the woodstove.  If you try this with a cold substrate the hot glue will cool too quickly to mold to the features of the timing belt. You want the substrate warm so it does not pull heat out of the molten polymer before we can mold it to the timing belt.

XL series timing belt mount using hot glue - 7

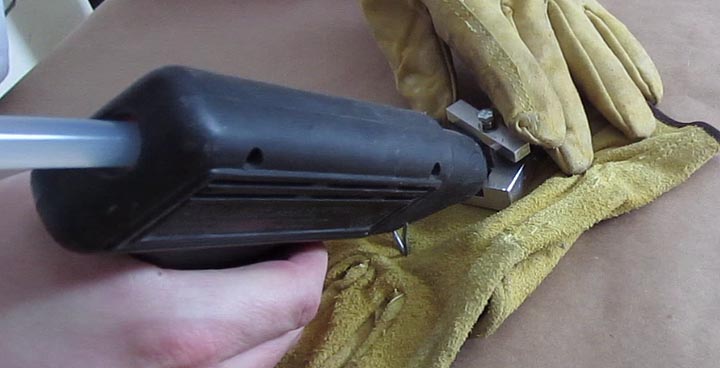
Quickly take your preheated substrate from your heat source, put it on a nonflamable surface (leather glove in this case) and fill both sides with hot glue quickly.  Use a bit more then you think you need, it will seep out the ends if there is too much in the slot.

XL series timing belt mount using hot glue4

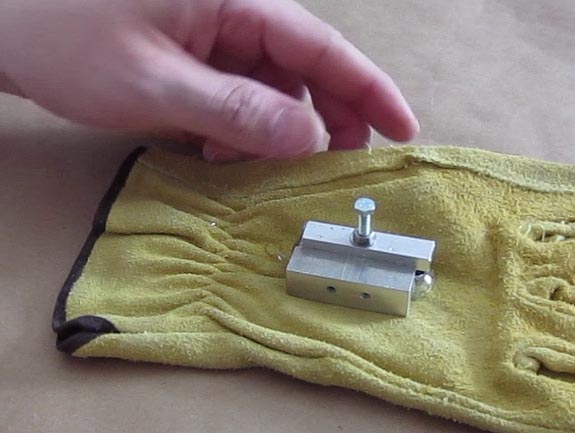
Then clamp down the timing belt into the molten plastic with the screw. I used a long screw to provide alignment and a nut to make clamping  easier and faster.  It is also acceptable to just squish it down with your fingers.   Put the hot assembly into cold water to quickly cool the hot melted plastic before it can seep out of the cavity.

XL series timing belt mount using hot glue

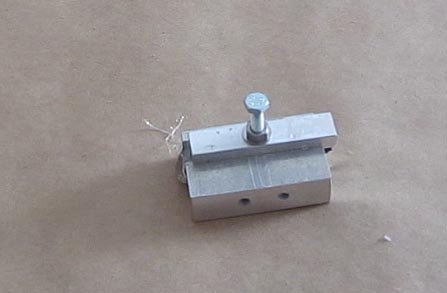
Let it cool completely before disassemble.  I’ve never had any issue with the hot glue sticking to the timing belt enough to be a problem.  Usually it is possible to remove the Timing Belt used to mold the plastic with fingers. If it is a bit stubborn in coming free use a small pair of pliers to get a grip on the bit of timing belt and slowly pull it up and away.

XL timing belt mount

When disassembled, trim up any of the plastic that seeped out with a sharp exacto knife or chisel.   As you can see you get a perfectly molded Timing Belt clamp that can be used for your project.

XL series timing belt mount

Here’s the finish timing belt in place on the 3D printer project.  The stepper motors have 10 tooth pulleys on them to drive the XL series timing belts allowing the y axis to move with positional accuracy.  More on the 3d printer progress as I have time to write.  It is nearly operational!


Converting a wood bandsaw into a metal cutting bandsaw

bandsaw conversion metal cutting

I needed a small metal cutting bandsaw for pre-cutting stock for my 3 axis CNC milling machine but I did not want to spend a lot of money on a new one.  I had been checking craigslist when this little gem came along.  It’s a Rockwell/delta 10″ bandsaw (here’s a copy of the owners manual for this saw) that  takes a 71 3/4″ blade.  It has a nice rigid cast iron frame, metal band wheels, and an open drive mechanism making it perfect for a conversion.   The major difference, outside of the blade itself, between a wood cutting bandsaw and a metal cutting bandsaw is the blade speed.   Wood cutting bandsaws run too fast for metal cutting.  To convert over to metal cutting duties I needed to reduce the speed of the band wheel by about a factor of ten.

bandsaw conversion- gear reducer   Band saw conversion metal cutting

My initial inclination was to use a larger pulley to slow down the blade but some calculations determined even a double pulley reduction would not slow it down as much as I would like.   I went through my list of parts on hand and decided to employ an EPL series motion control gear reduction unit with an 8:1 reduction ration.  That would slow the bandsaw blade down with the pulleys I had on hand to a good speed for cutting metal.

Making a spindle- metal cutting bandsaw conversion    metal cutting bandsaw

The gear reduction drive is designed to bolt onto a face mounted motor and as such has a female shaft mount on one end.  I quickly turned a spindle from some steel stock to 24mm on the gear drive end and 5/8″ on the other for the pulley.  The goal of this project was to quickly have a good metal cutting bandsaw with what I had on hand and minimal spend.   Coming back to the discourse on design, I was designing with what I had available for this project.  It may seem a bit ridiculous to use such an expensive part on a $50 saw but I figure I can always pull the gear reducer later if a more pressing need for it arises.

 DIY metal cutting bandsaw   DIY metal cutting bandsaw conversion speed reduction

I decided to reuse the original belt that came with the saw.  I upgraded the stock pulley to the largest one I had on hand, and drilled some holes into the legs of the stand to mount the reduction drive.  The gear drive needed a bracket to support it on the other end.   One was fabricated out of 1/8″ steel stock.   This arrangement required the motor to be relocated which was accomplished by drilling 4 new holes in the correct location on the base of the stand.  Be sure to check the motor rotation and reverse it (usually swapping wires inside the motor wire box) to correct it if the blade is going the wrong way.

bandsaw conversion   how to convert a wood bandsaw to metal cutting

The new drive belt is a 4L290, as I happen to have 3 of them on hand.   I only had to buy 2 parts in addition to the bandsaw itself for this project.   The first was the small pulley that is mounted on shaft of the gear reduction drive.  I purchased a 2 3/4″ dia pulley with a 3/4″ bore at my local tractor supply store.  Tractor supply has a good selection of motors, pulleys, and belts in stock.  Not a lot of hardware stores carry these items in this day and age.   I had to bore out the pulley’s 3/4″ bore  to 20mm on the lathe to make it fit onto gear reduction unit output shaft.

Wiring on old tools is horrific and when I opened the electrical box up I was thankful I didn’t get electrocuted when I tested out the saw.  I replaced all of the 40 year old scary wiring and upgraded the switch with a modern unit.

Wood bandsaw to metal bandsaw conversion     Reducing the blade speed on a wood cutting bandsaw

The only other part I purchased for this project was a small spacer for the handybox that encloses the wiring for the bandsaw.  These are available at Home Depot for less then a buck.  The new switch I selected did not fit in the enclosure, requiring the spacer.  I used the CNC mill to cut the opening in the switchplate.

The finished tool works well and I’ve already cut several linear feet of aluminum stock on this saw, with a 6 tpi wood blade in place.  I’ll be ordering up some good bi-metal blades in the near future.  I am very happy with this little project and foresee myself getting many years of good use out of this saw.

More efficient lumber milling with an Alaskan Chainsaw Mill

Cutting pine lumber with an Alaskan Chainsaw Mill

I recently traded some cut firewood for a nice log or two for milling with my Alaskan Chainsaw lumber mill I built some time ago.   I tried a more efficient approach towards milling lumber with the chainsaw mill on these logs.  I cut large thick slabs (5″ thick in this case) with the chainsaw mill. I then used a table saw to rip them down to 5/4 rough cut boards.  It takes two passes and flipping the “slab” to cut each board but it’s much faster and wastes less wood due to Kerf.  With my 10″ saw I can cut 6″ wide slabs and will mill the slabs at this thickness in the future.  The only drawback to this method is that the thick slab is very heavy.  I managed by using carefully by using roller supports and lots of effort.  As you take each board off it becomes easier and easier to move and feed the thick slab.

Using the chainsaw mill coupled with the quick efficiency of the circular saw blade on my table saw greatly sped up the lumber production.  My old tired light weight craftsman table saw that I bought back in high school has been on top of my tools to replace list for a very very long time.   I knew I wanted a full on cabinet saw with the capability to cut a full sheet in half.  I periodicaly check craigslist for tools, and after milling these logs with the much faster and easier Alaskan saw mill and table saw combination I was once again looking for the right table saw.

As luck and fate would have it, I found exactly the saw I wanted listed at a ridiculously low price.  I sent an email and when I got a call back I was shocked to find it was available. I ran up to check out the saw and it was perfect!  Needless to say it came home with me.


  My particular Delta Unisaw came with teh 52″ biesemeyer fence  so I can cut a 8 foot sheet of plywood in half with it.   The biggest challenge with my new saw is completely rearranging my shop area for the new tool.  I knew it would be a problem but I didn’t realize how big of an issue finding a location for the large saw (it’s 7 ft wide with the fence installed) would prove to be.  I may build myself a shorter 30″ fence for regular use and swap the fence for my occasional panel cutting needs

wide pine boards milled with an alaskan chainsaw mill

    I still love turning logs into lumber.  I wondered if it would get old eventually but it has not as of yet.   It is excellent excercise and sure beats boring excercise at the gym.   The above photo shows some of my dried wide pine boards.  My planer only handles 13″ wide boards. The stacked boards supporting the upright rough ones has all been planed to slightly over 1″ thickness.  I will be using this wood and my new table saw in the very near future to build myself some much needed country style bookshelves and a small table or two.  Stay tuned for future posts on those projects.

How to make a drill press spindle lock clamp


Drill press spindle lock assembly


It has been some time since my last post.  Summer is the time for swimming, sunshine, adventures, friends, fishing, and so on.  All of that has been keeping me pretty busy these days.  Here’s a post on a recent project to keep you entertained. I needed a spindle locking mechanism for my large drill press to help me convert it into a wood branding press.  The nice thing about having the  CNC milling machine I built for myself is that when I need a part or machine I can readily make it. It’s hard to imagine how I survived in the days before having CNC machining in the shop.

There was no built in spindle locking mechanism for my industrial drill press, and no add-on accessory available for purchase to lock the spindle.  I decided to take action and design my own add on mechanism.  I feel the best way to lock the spindle was to clamp the lower spindle were the Morse Taper socket is located on the bottom of the spindle (shown in the photo above).  I originally toyed with a removable pin mechanism in the spindle itself, or clamping the belts up top somehow.  Both of those ideas seemed more difficult then the solution I will share in this post.


I started with a piece of half inch aluminum stock.  This was an old adapter plate from some work years ago.  As such it had a few holes in it.  I carefully selected the origin of my part such that the machining would remove the material where the existing holes were located.  This careful setup up allows me to reuse scrap stock or old material from previous projects.   The next set of photos are just time lapse photos of the machining for your oogling pleasure, as such I will not comment much on them.


As you can see the finished part was milled out of the aluminum stock.  The only real downside to machining parts this way is at the end you are left with a small very sharp triangular nub on wherever the cutter started out.  I simply file this material off by hand.  For more exacting machining work, I would have made a jig by drilling and taping mounting bosses inside the part somewhere, this way the profile would be machined completely, resulting in a higher quality machined part.

The part took 30 minutes to machine. I might have been able to push up the machining speeds but I’m reluctant to push the speed as I do not want to break my end mill. This was my first part cut with the new HSMworks software I installed thanks to learning about the free version from Jim Wilkinson on Facebook a while back when he saw a previous project post.  Thanks Jim!


The next step after the CNC milling of the drill press spindle lock’s body was to drill and tap a single clamping screw. I used a 1/4″ – 20  tpi tap.  I tend to use quarter twenty bolts for just about everything not load critical in my designs as I stock a large variety of bolts in that size in my shop.  Simplifying your designs by using only a few standard threads for all of your projects is a good idea for hobby projects where weight is not a concern.

Above you see the more or less finished spindle lock assembly in place. I had to take the left side depth guage/stop assembly off, but as this is only a single nut it takes less then five minutes to put on the spindle clamp.  I cut the slot out in the wood shop on a miter saw with a thin kerf carbide tipped blade.  I could have milled it but it is very fast to use a saw blade for slitting operations.  The only thing missing from this picture is a spacer to clamp down on and lock everything tightly in place.

Above you see the finished spindle lock assembly.  I quickly turned down a bit of 1″ aluminum round and made a spacer of the right size.  She’s all clamped down and I am now ready to do some wood burning with our new electric branding iron.

I hope to be more active in posting both here on projectsbyzac.com  and photosbyzac.com in the fall.  August is chock full of good stuff and will likely keep me too busy for regular weekly posts.  But stay tuned in the fall, the 3D printer project will be finished before christmas (personal goal).  There will be lots of posts on that as well as continued upgrades on the CNC milling machine and the completion of the Cafe Racer Honda CX500 motorcycle.